If you drive a Ford F150 4X4, you know how important it is to keep your truck’s brakes in top shape. Worn-out front rotors can affect your stopping power and safety.
But don’t worry—you don’t have to be a mechanic to change them yourself. In this guide, you’ll learn step-by-step how to replace your front rotors quickly and safely. By the end, you’ll save money, gain confidence, and keep your truck running smoothly.
Ready to get your hands dirty and take control of your truck’s maintenance? Let’s dive in.
Tools And Materials Needed
Before changing the front rotors on your Ford F150 4X4, gather all tools and materials. Having everything ready saves time and prevents frustration. Use quality tools for safety and better results. Below is a list of essential tools and materials needed for the job.
Basic Hand Tools
Start with a socket set including various sizes. A ratchet wrench helps remove bolts quickly. A breaker bar provides extra leverage for tight bolts. Use a torque wrench to tighten bolts to the right specification. Have a flathead screwdriver and a Phillips screwdriver ready for small parts.
Specialty Automotive Tools
A brake caliper tool or C-clamp is necessary to compress caliper pistons. A lug wrench or impact wrench removes and tightens lug nuts. A jack and jack stands safely lift and support your truck. Use a wheel chock to prevent the vehicle from rolling.
Replacement Parts And Consumables
Purchase new front rotors designed for the Ford F150 4X4. Replace brake pads along with rotors for best performance. Use brake cleaner spray to remove dirt and grease. Have brake grease for caliper slides and hardware. Keep clean rags and gloves handy for safety and cleanliness.
Credit: www.f150forum.com
Preparing Your Work Area
Clear your workspace and gather all tools before starting. Ensure the truck is on a flat surface and the parking brake is set. Safety first: wear gloves and eye protection to avoid injuries.
Clear The Space Around Your Truck
Start by moving any tools, boxes, or debris away from your work area. A clean space helps you work safely and efficiently. Make sure you have enough room to move around your Ford F150 4X4 without obstacles. Avoid working in crowded or cluttered spots to reduce accidents.
Gather Essential Tools And Safety Gear
Collect all needed tools before beginning. This includes a jack, jack stands, lug wrench, and socket set. Wear safety glasses and gloves to protect your eyes and hands. Proper gear keeps you safe from dust, dirt, and sharp parts.
Set Up On A Level Surface
Place your truck on flat, solid ground. Avoid hills or uneven surfaces to prevent the vehicle from rolling. Use wheel chocks behind the rear tires for extra stability. A steady truck ensures a smooth rotor change process.
Ensure Proper Lighting
Work in a well-lit area to see every detail clearly. Natural daylight is best, but a bright work lamp works well too. Good lighting helps avoid mistakes and speeds up the task.
Safety Precautions
Changing the front rotors on a Ford F150 4X4 needs care and attention. Safety is the top priority before starting any work. Taking the right safety steps protects you and your truck from damage.
Ignoring safety rules can cause injury or make the repair harder. Follow simple guidelines to keep the job safe and smooth.
Use Proper Protective Gear
Wear safety glasses to protect your eyes from dust and debris. Use gloves to keep your hands safe from sharp parts. Closed-toe shoes help protect your feet from heavy tools or parts that might fall.
Secure The Vehicle Correctly
Park the truck on a flat surface and set the parking brake. Use wheel chocks behind the rear wheels to stop the truck from moving. Always use jack stands to support the truck after lifting it with a jack.
Handle Tools And Parts With Care
Use the right tools for each step to avoid slipping or breaking parts. Keep tools organized and within reach. Avoid rushing to prevent mistakes and accidents.
Follow Manufacturer Guidelines
Refer to the Ford F150 manual for correct torque settings and part specifications. Using the correct procedures ensures the rotor fits and works properly. This step prevents damage to the brake system.
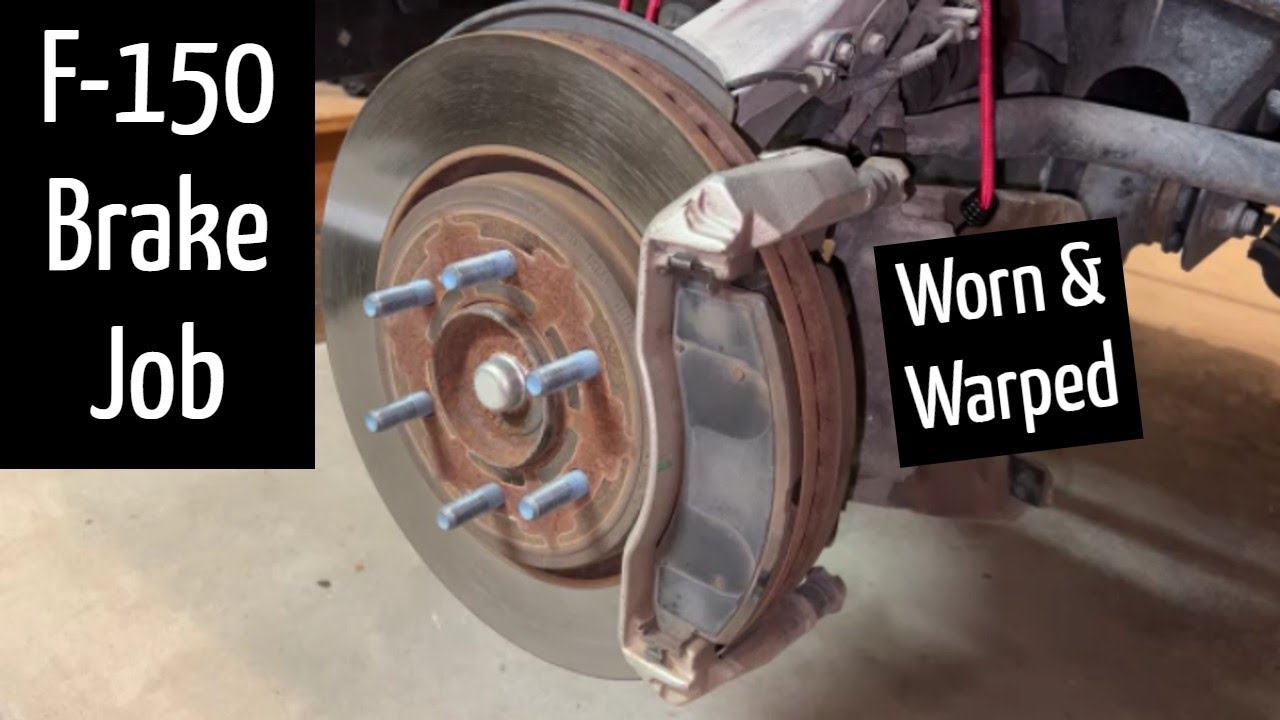
Credit: www.youtube.com
Lifting And Securing The Truck
Lifting and securing your Ford F150 4X4 is the first step to safely change the front rotors. Proper lifting gives you clear access to the brakes and prevents accidents. Safety must be your top priority before starting any work under the truck.
Use the right tools to lift the truck. This ensures stability and avoids damage. Follow a clear process to keep the truck steady during the repair.
Lifting The Front Of The Truck
Park the truck on a flat, solid surface. Engage the parking brake to stop any movement. Place wheel chocks behind the rear tires for extra safety.
Locate the front lifting points under the frame. Use a hydraulic floor jack to raise the truck. Lift slowly until the front tires are off the ground.
Placing Jack Stands
Never rely on the jack alone to hold the truck. Slide jack stands under the recommended support points near the front wheels. Lower the truck gently onto the stands.
Ensure the stands are stable and evenly support the truck’s weight. Give the truck a slight push to confirm it does not move.
Removing The Front Wheels
Use a lug wrench to loosen the wheel nuts before lifting. After the truck is on jack stands, remove the nuts completely. Take off the front wheels and set them aside.
Now, you have clear access to the rotors for replacement. The truck is safely lifted and secured, ready for the next step.
Removing The Wheel
Start by loosening the lug nuts on the wheel with a wrench. Then, lift the truck using a jack and remove the wheel carefully. This step gives clear access to the front rotors on your Ford F150 4X4.
Preparing Your Ford F150 For Wheel Removal
Start by parking your Ford F150 on a flat surface. Engage the parking brake to keep the truck stable. Place wheel chocks behind the rear wheels to prevent rolling. Gather all tools needed, including a lug wrench and a jack.
Lifting The Truck Safely
Use a hydraulic jack to lift the front side of your truck. Locate the correct jacking point near the wheel. Pump the jack handle slowly until the tire is off the ground. Secure the truck with a jack stand for safety before removing the wheel.
Loosening And Removing Lug Nuts
Use a lug wrench to loosen the lug nuts slightly before lifting. Turn each lug nut counterclockwise. After lifting, remove the lug nuts completely. Keep them in a safe place to avoid losing any.
Taking Off The Wheel
Grab the wheel firmly with both hands. Pull the wheel straight off the hub. If the wheel sticks, tap the back with a rubber mallet. Set the wheel aside in a safe spot to avoid damage.
Taking Off The Brake Caliper
Taking off the brake caliper is the next step in changing front rotors on a Ford F150 4X4. This part holds the brake pads in place and must be removed carefully. Removing the caliper allows access to the rotor for replacement. Safety is key during this process.
Use the right tools and follow each step closely. Avoid damaging the brake line or other parts. A loose or damaged brake caliper can cause problems later. Take your time and work slowly.
Prepare Your Work Area And Tools
Start by parking the truck on a flat surface. Use wheel chocks to stop the vehicle from moving. Gather a socket wrench, a screwdriver, and a bungee cord or rope. These tools help remove and hold the caliper safely.
Remove The Caliper Bolts
Locate the bolts that hold the brake caliper on the wheel hub. Use a socket wrench to turn these bolts counterclockwise. Keep the bolts in a safe place for reinstallation. Do not force the bolts if they are stuck; apply steady pressure.
Lift And Secure The Brake Caliper
Once bolts are removed, carefully lift the brake caliper away from the rotor. Avoid pulling on the brake hose. Use a bungee cord or rope to hang the caliper on the suspension. This prevents stress on the brake line and keeps the caliper safe.
Removing The Old Rotor
Start by lifting the truck and removing the wheel. Next, take off the brake caliper and support it carefully. Finally, slide the old rotor off the hub to prepare for the new one.
Preparing Your Workspace
Start by parking your Ford F150 on a flat surface. Engage the parking brake. Place wheel chocks behind the rear tires for safety. Gather all necessary tools like a jack, lug wrench, and socket set. Wear gloves to protect your hands. Clean the area around the wheel to remove dirt and debris.
Loosen the lug nuts on the front wheel slightly before lifting the truck. Use a jack to raise the front of the truck. Secure it with jack stands for safety. Remove the lug nuts completely and take off the wheel. Set the wheel aside where it won’t roll or fall.
Detaching The Brake Caliper
Locate the brake caliper mounted over the rotor. Use the correct socket to remove the caliper bolts. Carefully slide the caliper off the rotor. Support the caliper with a hanger or rope to avoid strain on the brake line. Do not let the caliper hang freely.
Removing The Brake Pads And Caliper Bracket
Take out the brake pads from the caliper bracket. Remove the bolts holding the caliper bracket to the wheel hub. Set the bracket aside safely. This step clears access to the old rotor.
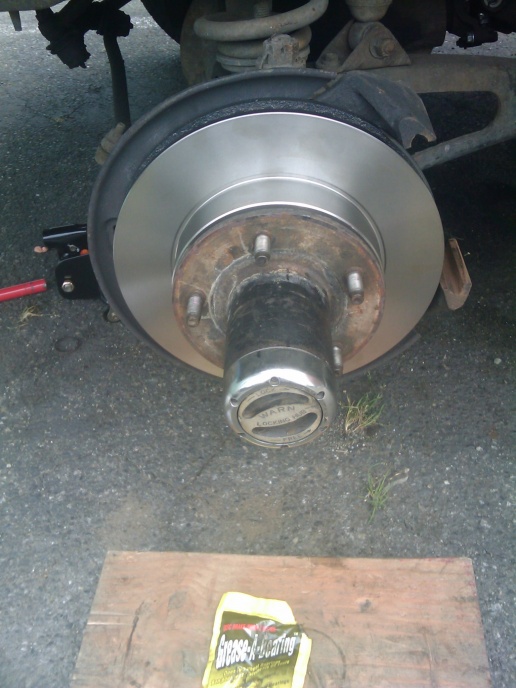
Taking Off The Old Rotor
Check if the rotor is held by retaining screws. Remove any screws with a screwdriver. Tap the rotor gently with a rubber mallet if it sticks. Pull the rotor straight off the wheel hub. Clean the hub surface before installing the new rotor.

Credit: www.f150forum.com
Installing The New Rotor
Installing the new rotor on your Ford F150 4X4 is a key step to restore brake performance. Take your time to place it correctly. Proper installation ensures safety and smooth driving.
Clean The Hub Surface
Start by cleaning the hub surface where the rotor sits. Remove rust and dirt with a wire brush. A clean surface helps the rotor fit tightly and prevents wobbling.
Align The Rotor Properly
Place the new rotor onto the hub carefully. Make sure the holes align with the wheel studs. Proper alignment stops the rotor from moving during driving.
Secure The Rotor In Place
Use the rotor retaining screws or clips to hold the rotor. Tighten them just enough to keep the rotor steady. Avoid over-tightening to prevent damage.
Reinstall The Brake Caliper
Position the brake caliper back over the rotor. Slide it carefully to avoid damaging brake pads. Tighten the caliper bolts firmly to secure it.
Reattaching The Brake Caliper
Reattaching the brake caliper on your Ford F150 4X4 is a key step after changing the front rotors. This part holds the brake pads and presses them against the rotor to stop the truck. Properly securing the caliper ensures safe and effective braking.
Take care to align the caliper with the rotor and the mounting bracket. This keeps the brake pads in the right place. Avoid forcing parts as it can damage brake components.
Positioning The Brake Caliper
Place the caliper over the rotor carefully. Make sure the brake pads sit evenly on both sides of the rotor. Check that the caliper slides easily on its pins.
Securing The Caliper Bolts
Insert the caliper bolts into their holes. Tighten them by hand first to avoid cross-threading. Use a torque wrench to tighten bolts to the exact factory specs.
Checking Brake Line And Hardware
Inspect the brake line for any twists or damage. Confirm the caliper hardware, like clips and pins, is properly installed. These parts keep the caliper stable during braking.
Testing The Brake Caliper Function
Before driving, press the brake pedal slowly. Feel for firmness, showing the caliper is working well. Recheck bolts and hardware if the pedal feels soft or spongy.
Testing And Final Checks
After changing the front rotors on your Ford F150 4X4, testing and final checks are crucial. They ensure your brakes work properly and keep you safe on the road. This step confirms that everything is installed correctly and ready for use.
Checking Brake Fluid Levels
Start by checking the brake fluid reservoir. Make sure the fluid level is between the minimum and maximum marks. Low brake fluid can cause poor braking performance. Add brake fluid if needed, but do not overfill.
Inspecting Brake Pads And Rotor Alignment
Look closely at the brake pads and rotors. The pads should sit evenly on the rotor surface. Check for any signs of rubbing or misalignment. Proper alignment prevents uneven wear and noise during braking.
Testing Brake Pedal Feel
Press the brake pedal several times with the engine off. It should feel firm and not sink to the floor. A soft pedal may indicate air in the brake lines. Pump the pedal to build pressure before driving.
Performing A Slow Speed Brake Test
Drive your truck slowly in a safe area. Apply the brakes gently and listen for unusual sounds. The truck should stop smoothly without pulling to one side. Test several times to be sure the brakes respond well.
Rechecking For Leaks And Loose Parts
After the test drive, check under the truck for brake fluid leaks. Also, inspect all bolts and components to ensure they are tight. Secure parts prevent future problems and maintain brake efficiency.
Frequently Asked Questions
How Do I Know When To Change Front Rotors On Ford F150 4×4?
Look for vibration, squealing noise, or visible rotor damage while driving.
What Tools Are Needed To Change Front Rotors On Ford F150?
You need a jack, lug wrench, socket set, C-clamp, and screwdriver.
How Long Does It Take To Change Front Rotors On Ford F150?
It usually takes about 1 to 2 hours for a beginner.
Can I Change Front Rotors Without Removing The Wheel Hub?
No, the wheel hub must be removed to access and change the rotors.
What Safety Steps Should I Follow Before Changing Rotors?
Park on level ground, use wheel chocks, and wear safety glasses and gloves.
Should I Replace Brake Pads When Changing Front Rotors?
Yes, changing brake pads with rotors ensures better braking performance.
Can I Reuse Old Rotors After Resurfacing Them?
Resurfacing is possible only if rotors meet thickness and condition specs.
How Tight Should Lug Nuts Be After Rotor Replacement?
Use a torque wrench and tighten lug nuts to the manufacturer’s specs.
What Common Mistakes To Avoid When Changing Front Rotors?
Avoid not loosening caliper bolts fully and forgetting to compress the brake piston.
How Often Should Front Rotors Be Inspected On A Ford F150?
Inspect rotors every 12,000 miles or during every brake pad change.
Conclusion
Changing front rotors on your Ford F150 4X4 is simple with the right steps. Take your time and follow the process carefully. Proper tools and safety gear help avoid mistakes. Clean parts before installation to ensure good performance. Regular brake checks keep your truck safe on the road.
Practice makes this task easier over time. You can save money and feel proud doing it yourself. Keep learning and maintaining your vehicle well.
As an Amazon Associate, I earn from qualifying purchases