As an Amazon Associate, I earn from qualifying purchases
Jumping a car battery can be tricky. Doing it wrong can be dangerous.
If your Honda Civic’s battery dies, you might need to jump-start it. This simple process can save you from being stranded. But it’s crucial to do it safely to avoid damage or injury. In this guide, we will walk you through the steps to safely jump a Honda Civic.
From gathering the right tools to connecting the cables correctly, we’ll cover everything you need to know. By following these steps, you can get back on the road quickly and safely. Whether you’re a seasoned driver or new to car maintenance, this guide will help you handle a dead battery with confidence.

Credit: www.youtube.com
Preparation
Jumping a Honda Civic is a task that needs careful preparation. Properly preparing can prevent damage and ensure safety. Follow these simple steps to get ready.
Gather Necessary Tools
Before starting, gather all needed tools. You will need jumper cables, a working vehicle, and safety gloves. Make sure the jumper cables are in good condition. Frayed cables can be dangerous.
Find A Safe Location
Choose a safe location for jumping the car. A flat, open area is ideal. Avoid busy roads and traffic. Safety is the top priority. The area should have enough space for both cars.
Identify Battery Terminals
Jump-starting a Honda Civic can seem daunting, but it’s a simple process. The first step is to identify the battery terminals. Knowing which is positive and which is negative is crucial. Connecting them incorrectly can damage the vehicle. Follow these steps to safely identify the battery terminals.
Locate Positive Terminal
The positive terminal is easy to find. Look for a red cover or a plus sign (+) near the terminal. The positive terminal is usually larger than the negative terminal. It might also have a red cable connected to it. This is the terminal that you will connect to the positive terminal of the other vehicle’s battery.
Locate Negative Terminal
The negative terminal also needs to be identified. Look for a black cover or a minus sign (-) near the terminal. The negative terminal usually has a black cable connected to it. This terminal will be connected to the negative terminal of the other vehicle’s battery or a metal part of the car.
Connecting Jumper Cables
Jump-starting a Honda Civic is simple if you follow the right steps. The first important step is connecting the jumper cables properly. This ensures safety and a successful jump-start. Let’s break it down step-by-step.
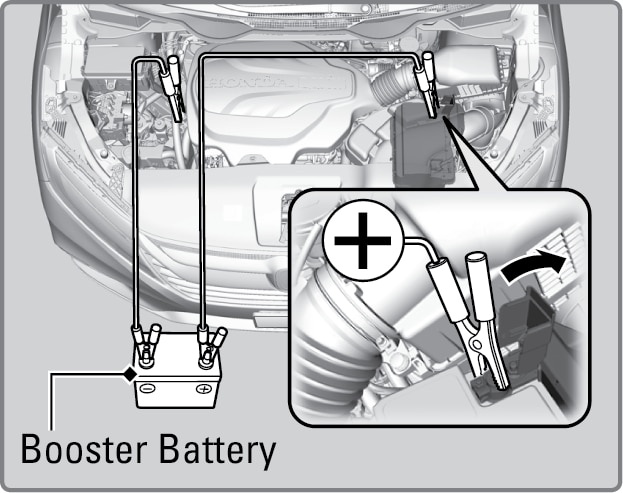
Attach To Dead Battery
First, locate the dead battery in your Honda Civic. Open the hood and identify the battery terminals. The positive terminal is usually marked with a plus sign (+) and is red. The negative terminal is marked with a minus sign (-) and is black.
- Take the red jumper cable clamp.
- Attach it to the positive terminal of the dead battery.
- Ensure the connection is secure and firm.
Next, take the black jumper cable clamp. Attach it to a metal part of the car’s frame. This acts as the ground and helps prevent sparks.
Attach To Live Battery
Now, locate the live battery in the working vehicle. Open the hood and find the battery terminals.
| Step | Action |
|---|---|
| 1 | Take the other end of the red jumper cable. |
| 2 | Attach it to the positive terminal of the live battery. |
| 3 | Ensure the connection is tight and secure. |
Lastly, take the other end of the black jumper cable. Attach it to the negative terminal of the live battery. Ensure it is firmly connected.
Now, both batteries are connected. You are ready to jump-start your Honda Civic.

Credit: www.honda.ca
Starting The Engine
Starting the engine of a Honda Civic after a jump start can be tricky. Follow these steps to ensure a smooth process. This section will guide you through starting both the donor car and the Honda Civic. Each step needs careful attention to avoid any mishaps.
Start The Donor Car
First, start the donor car. This car provides the necessary power to jump-start your Honda Civic. Ensure the donor car’s engine is running smoothly. Let it run for a few minutes. This helps to charge the dead battery of the Honda Civic.
Start The Honda Civic
Next, try starting the Honda Civic. Turn the key in the ignition to the start position. If the engine doesn’t start immediately, wait for a minute. Then, try again. The connection might need a moment to pass the charge.
Once the Honda Civic starts, let it run for a while. This allows the alternator to recharge the battery. Keep the engine running for at least 10 minutes. This ensures the battery gets enough charge. If the car still doesn’t start, check the connections. Ensure the cables are properly attached.
Removing Jumper Cables
Removing jumper cables from your Honda Civic is a crucial step. Doing it wrong can cause sparks or damage. Follow these simple steps to ensure safety.
Detach From Honda Civic
First, turn off both cars. This prevents electrical issues. Start with the negative cable. It’s usually black. Disconnect it from your Honda Civic’s battery. Next, remove the positive cable. It’s usually red. Disconnect it from your Honda Civic’s battery. Make sure the cables don’t touch each other.
Detach From Donor Car
Now, move to the donor car. Start with the negative cable. Disconnect it from the donor car’s battery. Then, remove the positive cable. Disconnect it from the donor car’s battery. Again, ensure the cables don’t touch each other. Store the cables safely. You have now successfully removed the jumper cables.
Post-jump Actions
Jumping your Honda Civic safely is just the first step. After a successful jump, it’s crucial to take some post-jump actions to ensure your vehicle runs smoothly. These actions help in identifying any underlying issues and maintaining the battery’s health. Let’s dive into the necessary steps you should follow.
Check Battery Condition
Once your Honda Civic is running, inspect the battery condition. Look for any signs of damage or corrosion. You can use a battery tester to measure the voltage. A healthy battery should read around 12.6 volts when the engine is off.
Here’s a simple table to help you understand the battery readings:
| Battery Voltage | Condition |
|---|---|
| 12.6V or higher | Good |
| 12.4V – 12.6V | Acceptable |
| 12.2V – 12.4V | Low |
| 12.0V or lower | Replace Battery |
Monitor Engine Performance
After the jump, it’s important to monitor the engine performance. Keep the engine running for at least 20 minutes. This allows the alternator to charge the battery. Listen for any unusual sounds or vibrations. Pay attention to warning lights on the dashboard.
Here are some tips to keep in mind:
- Check for any fluctuations in engine idle.
- Ensure the headlights and other electrical systems are working.
- Notice any delay in starting the engine again.
Following these steps helps ensure your Honda Civic remains in optimal condition after a jump start. Always be attentive to any signs that indicate further issues.
Safety Precautions
Jumping a car can be tricky. Safety precautions are essential to avoid injuries. Incorrectly jumping a Honda Civic can cause damage. Follow these steps to stay safe and protect your car.
Avoid Sparks
Sparks can ignite fumes. Always connect cables in the correct order. Attach the positive cable to the positive terminal first. Then, connect the negative cable to a metal part of the engine. Never connect it to the battery’s negative terminal. This reduces the risk of sparks and explosions.
Wear Protective Gear
Always wear protective gear. Use gloves and safety glasses. These can protect you from battery acid and debris. Long sleeves are also a good idea. They add an extra layer of protection. Safety first, every time you jump a car.

Credit: www.wapcar.my
Troubleshooting
Jumping a Honda Civic may sometimes present unexpected issues. Knowing how to troubleshoot these problems can save time. Below are some key areas to check. Following these steps can ensure a safe and effective jump-start.
Check Cable Connections
First, ensure the jumper cables are securely connected. Loose or improperly connected cables can prevent a successful jump-start. Follow these steps:
- Check the red clamp on the positive terminal of the dead battery.
- Ensure the other red clamp is on the positive terminal of the working battery.
- Check the black clamp on the negative terminal of the working battery.
- Ensure the other black clamp is on a metal part of the dead car.
Secure connections are vital for a proper current flow. Double-check each clamp to avoid any disconnections. If the car still won’t start, consider the next troubleshooting step.
Consult A Mechanic
If your Honda Civic still fails to start, it may be time to consult a mechanic. Some issues may require professional diagnosis. Here are some scenarios where professional help is beneficial:
- The battery may be completely dead and need replacing.
- There could be an issue with the car’s alternator.
- Electrical problems might be preventing a successful start.
A mechanic has the tools and expertise to diagnose and fix these issues. They can also check for any other underlying problems with your Honda Civic. Seeking professional help can save both time and frustration.
Frequently Asked Questions
How Do You Jump A Honda Civic?
To jump a Honda Civic, connect jumper cables to the battery terminals. Attach positive to positive and negative to negative. Start the working car, then start your Civic.
What Tools Are Needed To Jump A Honda Civic?
You’ll need a set of jumper cables and another vehicle with a functioning battery. Ensure the cables are in good condition.
Can I Jump My Honda Civic Alone?
Yes, you can jump your Honda Civic alone. Ensure you follow safety guidelines and properly connect the jumper cables.
How Long Does It Take To Jump A Honda Civic?
Jumping a Honda Civic typically takes around 10-15 minutes. Ensure the connections are secure and follow the correct sequence.
Conclusion
Jumping a Honda Civic is easy and safe with the right steps. Always follow the instructions carefully. Safety first, so wear gloves and goggles. Check connections twice to avoid mistakes. Keep metal objects away from the battery. Start the car after connecting the cables correctly.
Remove cables in reverse order once the car starts. Drive for at least 15 minutes to recharge the battery. Regular maintenance prevents future issues. Stay prepared and confident on the road.
As an Amazon Associate, I earn from qualifying purchases


